Like most things, I wondered if it could be done. And, more importantly, if I was capable of doing it. I enjoy experimenting with different ideas (thus the portrait) and then boasting about it (thus the web page!). It's pop-art in a geeky, post-modern, ironic, avant-garde, kind of way :)
When?
Over a couple of lazy evenings during the last bank holiday (26th-28th May 2001). I spent
a couple of hours each day just playing. During this time, I came up with a number of tricks to eke out
the number of bricks I needed.
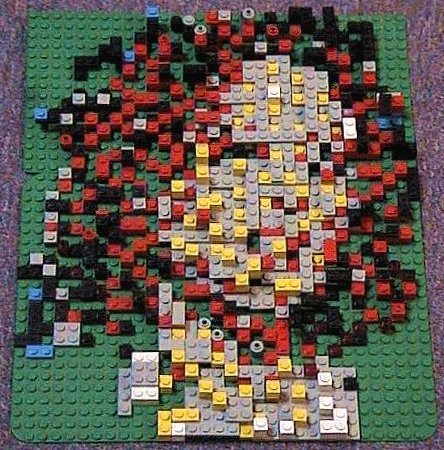
I built the image on two green bases, totalling an area of 40x32 bricks. The easiest method
would be to get 1280 bricks, 1x1 in size, of the appropriate colours, and place them accordingly. I don't have 1280 bricks, and
was not about to spend money on buying some. So I placed down a 1x3, and covered it with 1x2 to gain
a 1x1 of the appropiate colour. I then placed another 1x2 covering the other end producing the effect
of having three 1x1 bricks. However, this moved the image in the third dimension (which makes it physically
unstable in places), but it also gives the model a little extra interest. I still ran out of
bricks though, so I had to re-think my brick-placing strategy. Several times! Despite my best efforts, I still had
to use chimney pots, transparent bricks, Lego people feet, and other odd bricks to help out. But if you look at
the source image (top right of this page), or the 'final' product, you can still see large unfinished
areas. But as they say - "Release early, and often..."
How?
in, using the patented :-) "Steev's step-by-step guide to
Lego portraits".
- Find a photograph to use. The best ones, naturally, use only a few colours since
there are only six basic colours of Lego brick:
- Red
- Blue
- White
- Grey
- Yellow
- Black
This limits the sort of images you can create. Some specialist sets (like the 'Star
Wars' collection, for example) include brown bricks, but there generally never enough of them to be useful for models
other than the one supplied in the kit. By using a green base you have another colour to play with. It might seem
logical to make the base using the colour most prominent in the photograph. I don't believe this is a good idea.
You should pick a colour for which you have the smallest number of 1x1 bricks, as you will be using a lot of them.
- Create an image using only the Lego colours. I created a small gif file,
 which included the main seven colours I would be using. These colours are not exact, nor should they be, for
two reasons. 1) You Lego may be excessively dirty, so the white bricks would be light gray bricks! And 2) the dithering
algorithm (see next step) may be over zealous and try matching your colours exactly, producing an unwield design
of bricks.
which included the main seven colours I would be using. These colours are not exact, nor should they be, for
two reasons. 1) You Lego may be excessively dirty, so the white bricks would be light gray bricks! And 2) the dithering
algorithm (see next step) may be over zealous and try matching your colours exactly, producing an unwield design
of bricks.
- Remap your image into this palette, and review it. If it looks naff now, it will look awful when shrunk down, and
built from Lego. You might want to change the colours slightly for a better fit, or try several variations of dithering
algorithm. Also consider at this stage how many bricks of what sizes you have. If you have a lot of 1x1 bricks, then
an optimised palette may work well enough. If not, a Floyd-Steinberg dither may be in order. Use as many different packages
as you can find to produce an image, and only start building when you're happy with it.
My work turned  into
into 
You might find it beneficial to remove parts of the background manually to help the paint package dither effectively.
- Resize this image to that of your base. I used a 40x32 base. You can use any size you want, just think about the
number of Lego bricks you actually have to build the picture, and what size they are. You can create a very large
(but blocky) image if you have only 2x2 bricks and larger.
This turned into 
- Save this image, and enlarge it again to fill the screen. Use 'Edge Enhance' to help decern the edges of the each colour band. Make a printout if necessary, and mark on the
paper where the larger bricks would lay, covering as many squares as possible.
- Build up the image, one brick at a time. The tricky, and time consuming bit. The only hints I can offer are:
- Sort all your bricks into piles, determined by colour and size. This will help guide you on choices like
'1x2 red on a 1x3 black', or '1x1 black'?
- Start with the most detailed and important area and work outwards. Unless you have buckets of Lego, you will
run out before finishing.
- Don't be afraid of building upwards. A lot of my image is two bricks high. It's very easy to re-work the levels later to
steal bricks from underneath with rarely used colours (blue in my case).
- Step back occasionally. Seeing the portrait take shape is a great morale booster. Also, in later stages, when bricks are
low, he helps balance the image better, if you've been concentrating too hard on one area.
- Use a 2x2 flat piece with two 1x2s attached to each corner (eg,
 , to create the appearance
of four 1x1 pieces. The overlaps can be covered easily with other 1x2 pieces. This method extends to any combination
of small bricks being placed over larger bricks.
, to create the appearance
of four 1x1 pieces. The overlaps can be covered easily with other 1x2 pieces. This method extends to any combination
of small bricks being placed over larger bricks.
- If you're working with a green base, trace the green outlines first. Bear in mind that you
can not use any covering tricks for green - as the only way to get a green in the image is to leave a
hole. It is often helpful to build around these holes early on, especially when there are clusters of green,
since this will use up most of your 1x1 bricks.
- Re-visit completed parts of the model.You will often find that in the process of building up, there are
some useful pieces buried under a mass of overlapping bricks.
- Similarly, you are also likely to find 1x2 bricks that could be replaced with 1x3, and tuck
the other 1x1 bit underneath something else. When building Tori, I once created a sequence of 5 or 6 replacements, just
to gain one 1x1 gray brick that I needed.
- Be prepared to change strategy mid-build. If you find a method that uses a lot of red bricks, you'll end up very
few of them left. Therefore, change your patterns to work around that.
- When complete, re-visit it again, evening out the model with whatever bricks are left over, and raising certain
features to make it more artistic. I tried to keep the hair fairly
flat, and the face, especially the nose, raised.
- Admire your creation from afar (literally) and tell everyone about it!
Why Tori?
Fantasic songwriter, great woman! I also had the good fortune to meet her after a concert in Loughborough, 1991. Lovely person, too!
 Marquis de Geek